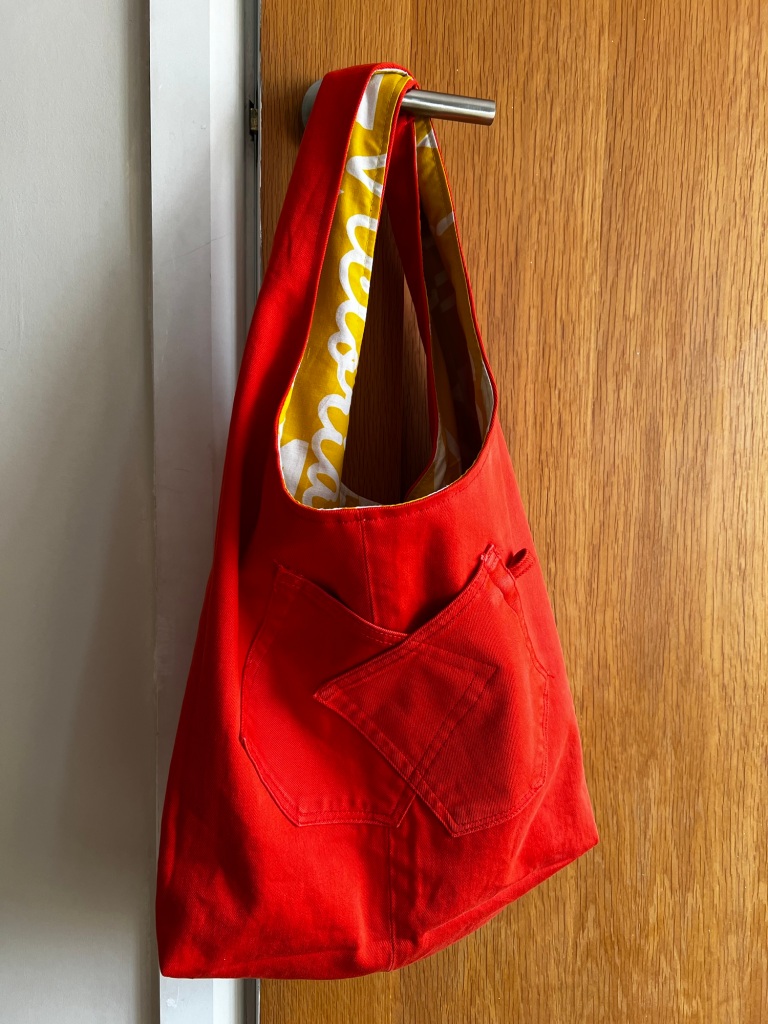
When I came across a pair of bright orange jeans in a charity shop I was dazzled. And, it being a bargain store the pair were mine for just £1. It didn’t matter that they were not my size… I wasn’t going to wear them, but turn them into a boho bag.
I’d seen how to make this type of bag on YouTube. There are numerous videos available, variations on the same design. This orange denim pair of jeans were perfect. The pattern makes use of the leg section only, so I still have the waist section in my stash.
Still got some orange denim to play with!
For the bag lining I made use of the remainder of a yellow duvet cover. I wanted a good colour contrast to the orange. And, having recently bought a yellow coat it was the obvious choice.
The pattern is easy, though turning through the second handle was tricky. I’m sure next time…because I can see that this pattern might well become addictive..I might look for a different solution. Though the beauty of this design is that all the seams are on the inside, making it so neat.
Before sewing up the outer sections I added two of the jeans’ pockets. I’d sewed them to make one larger pocket.
Two pockets making one with a belt loop for a bag charm
The iron is definitely needed during construction. Settling those seams made sewing up easy. And of course a final press before top stitching around the bag handles.
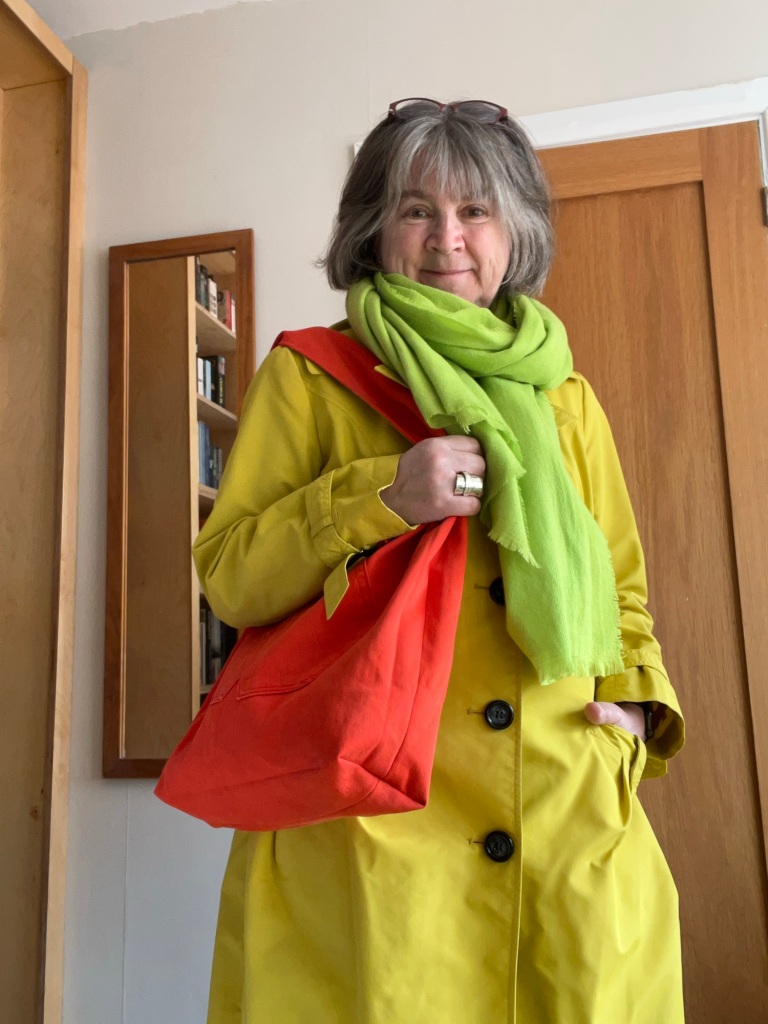
Job done!Bring on the brights!
I’m delighted with the finished bag. I’ll be looking out for other jeans, or patterned trousers for more boho options!
My card mannequin now has suitable footwear – and a fascinator. But she’s not done yet. I have further ideas to make sure she’s as chic as possible.
The fascinator makes use of a travel chess set, with a game in progress. The board was secured to an Alice band. The chess pieces glue-gunned.
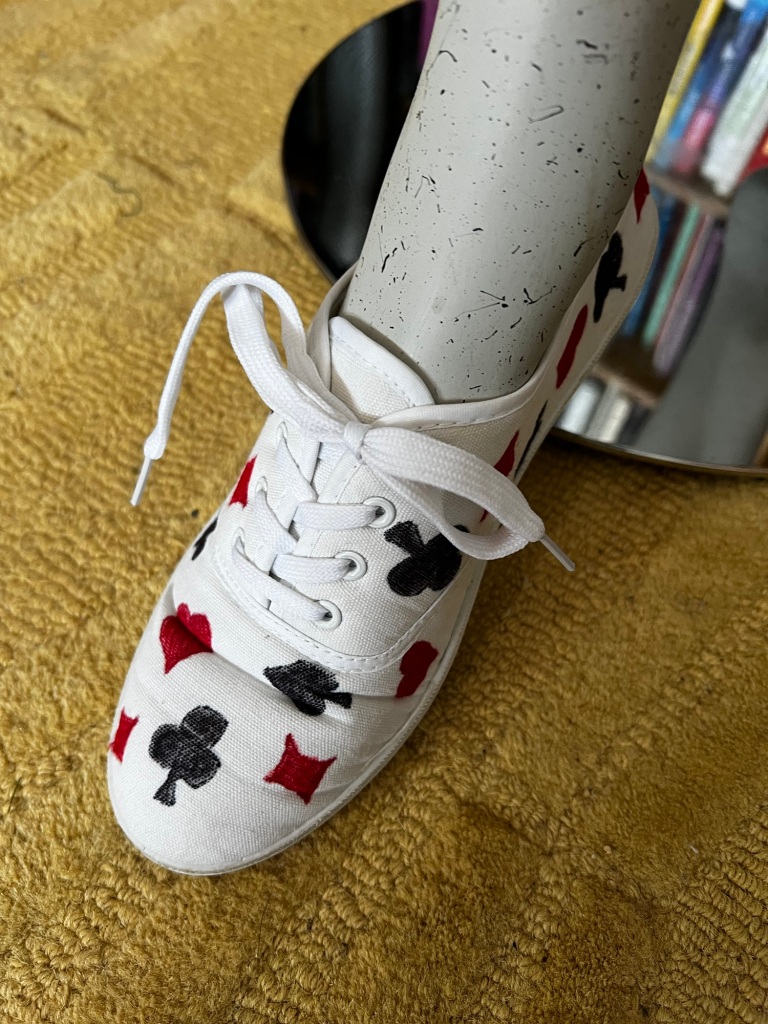
The mannequin is secured to the base plate by a short metal rod that goes into the left foot. This meant that I needed a soft shoe that I could make a hole through. Luckily I had a pair of white plimsolls which I rarely wore. I decided to use these rather than look to buy.
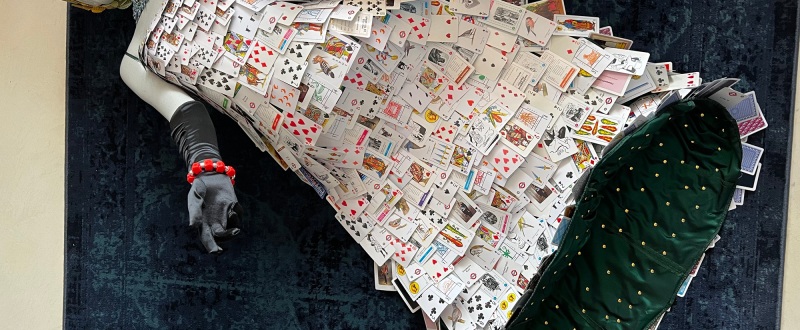
First I had to lift the top section of the mannequin, with the dress on, to access the legs. It was a two-person job! The feel of the dress with its playing card additions was like handling a piece of chainmail.
Close up of the underside of the dress.
With the mannequin placed (carefully) on the floor the underside of her dress was revealed. I’d earlier wired the hem to help give it a little stiffness to retain its shape. The brass fasteners certainly make a neat pattern.
The white plimsolls, with fabric uppers meant that I could decorate them. I chose to use the playing card suits as motifs. I used permanent markers to simply draw on the designs. Cutting the hole through the sole was done with a scalpel..easier than I imagined. The scalpel needed a good clean afterwards due to sticky residue from the plimsoll’s construction on the blade.
The left foot carries the title of this artwork. This foot is barely visible when the dress is in place.The right foot can be seen when the dress is on the mannequin.
It was enjoyable decorating the plimsolls and I can see that I might well do something like this again for myself.
When you look at a painting, or other work of art, how much do you know about the person who created it? Do you wonder about their creative process? Their inspiration? Do you think that knowing more about somebody makes you appreciate their work in a different way? Or is it a simple matter of ‘yes – I like it’ or ‘no, it’s not one for me’?
Growing up with an artist for a father I understand a fair bit about the creative process that underpinned his work. I wrote a biography of him a couple of years ago, during which I really immersed myself in his artwork. You can find out more about the book, The Sussex Surrealist, here:
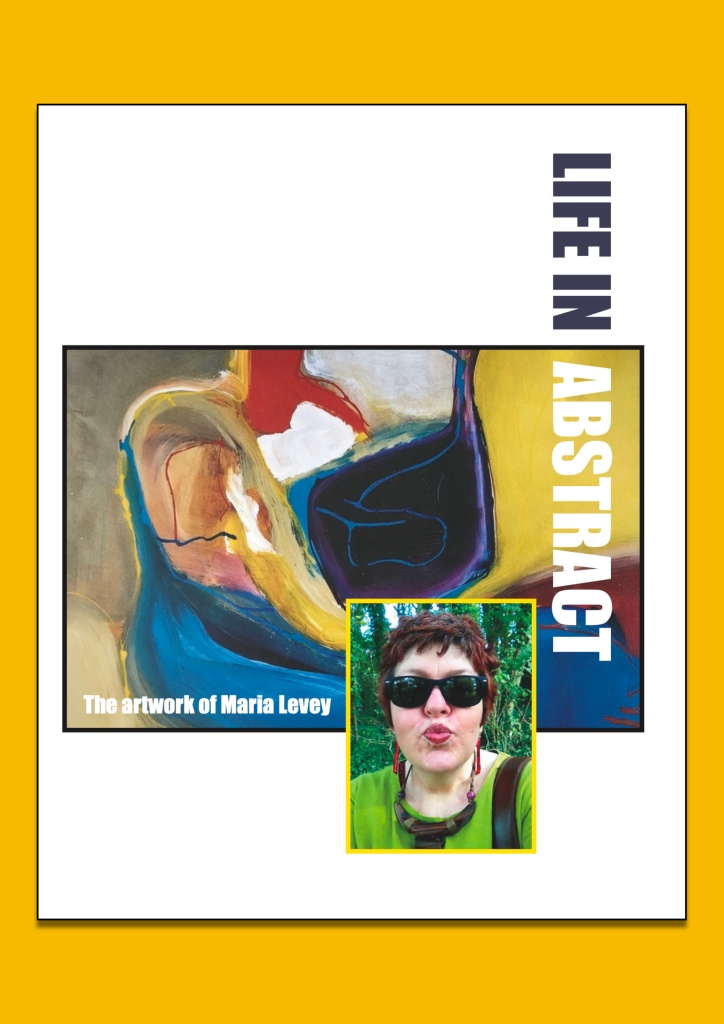
I have just published another book, Life in Abstract, which is about Maria Levey and her artwork. Like my father, she was completely self-taught. But unlike him she discovered her ability to paint after years working, getting married, and raising a family. But when Maria did start to paint, she threw herself totally into the creative process. Anyone who has discovered a new hobby will understand the compulsion to dive right in and explore all aspects of it.
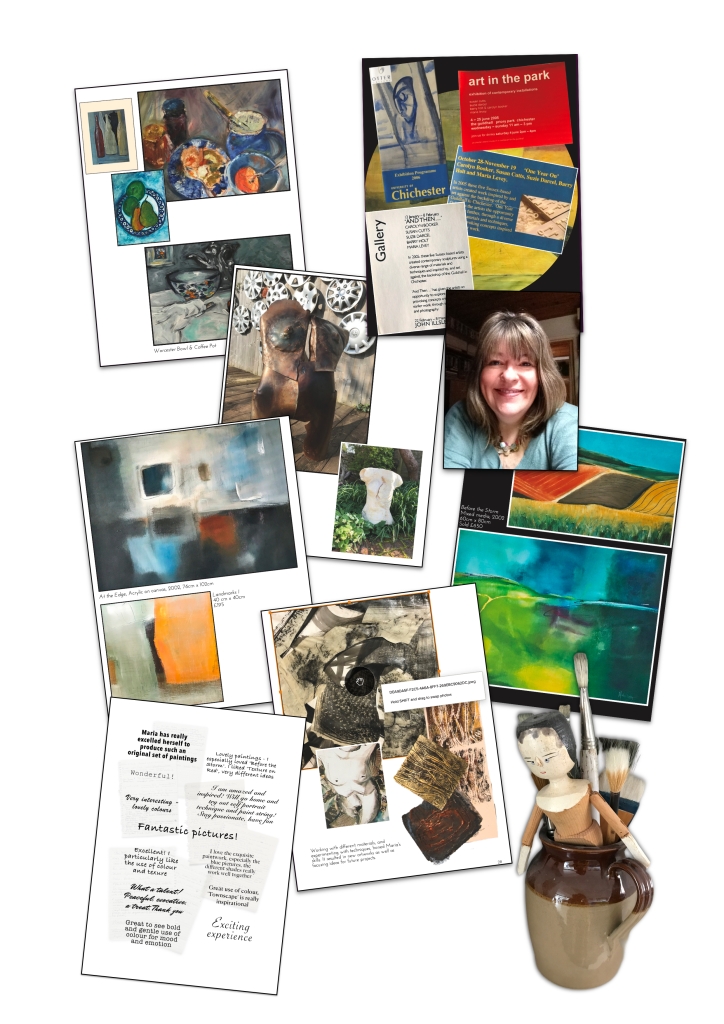
Maria started her painting journey with compositions of flowers, and still-life paintings with items easily gathered from domestic surroundings – bowls of fruit, bottles and plates. Simple, pleasing images but nothing overtly remarkable. She began to explore other subjects – particularly the human figure, and attended life-drawing classes to improve her technique. And like many discovering new talents, she sought out like-minded people to share her creative ideas with and teach her new skills.
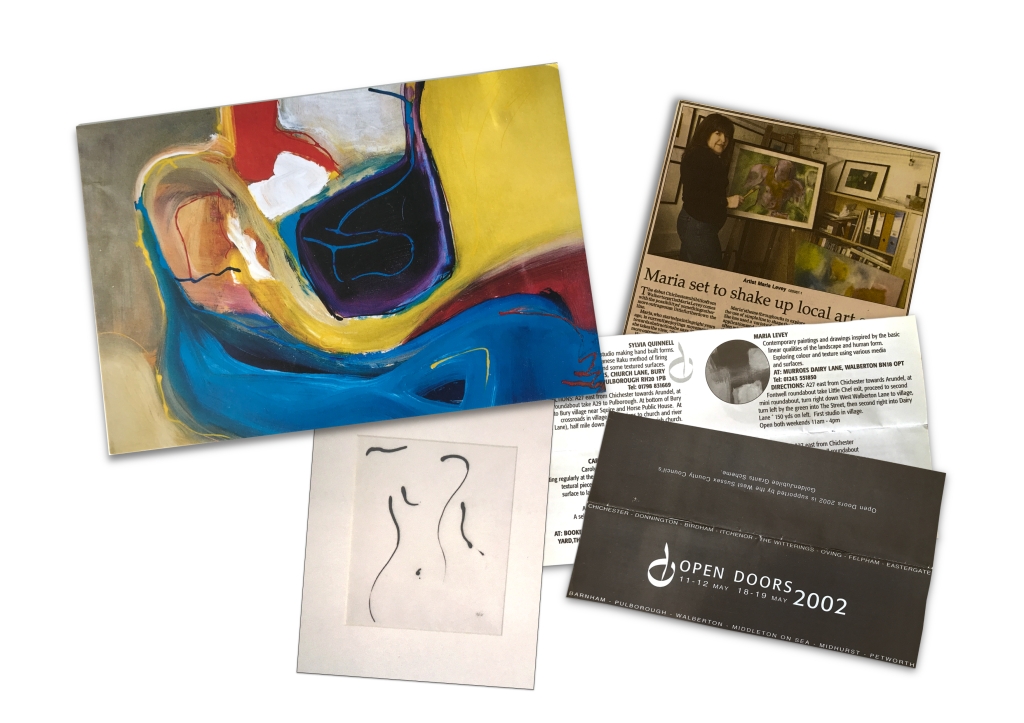
As Maria worked on her paintings she developed a love of the abstract, particularly interpreting the landscape in this way. And her abstract pieces are imaginative, evocative, and among her best work. She had her artwork professionally framed and exhibited locally. Her paintings were well-received and sold, with commissions requested. Maria also investigated three – dimensional work, creating pieces from wire, metal, resin, and cloth. And this was where her last pieces were taking her. Why last? Maria died in 2015 two years after being diagnosed with cancer. She was just 57 years old.
Maria died before I was introduced to her work, but I have been able to speak at length to her husband and a close friend, and listen to their reminiscences. And I’ve been given privileged access to her artwork, press cuttings, and exhibition notes. It was this background information that enabled me to write this book.
What became abundantly clear was the familiarity of the creative process. Watching a painting come to life, preparing submissions for exhibition, the excitement of having an article in the local paper. But because Maria is – was – my generation, a wife, mother, sister, creative – I also recognised those footsteps. From the start of writing I knew of the cancer diagnosis and I wanted to be sensitive to her family and friends. It wasn’t the easiest biography to write, not least because Maria’s early life too had its own complex emotions to navigate. But I didn’t want this book to be one of sadness or mawkishness, but to showcase Maria as an artist, focussing on her work. So I’ve laid out the chapters of her life, with the emphasis on the creative years, where her enthusiasm for painting, art – her own and the appreciation of others – hopefully shine through.
There is no escaping that inevitable question – the ‘but what if….’. What if Maria hadn’t had that diagnosis? Where would her art have taken her today, in 2024? Life really was good for Maria and her family, until suddenly it wasn’t.
There are many paintings out in the world by amateur artists who never made the national or international gallery. But behind every one of those paintings, prints, sculptures or drawings, is a unique human being. I hope that this book reveals a little more about just one of them.
The book, Life in Abstract, is available for £12 here:
My Christmas tree mannequin is now in the garden – though minus her festive decorations. Her twin sister is undergoing a transformation of her own.
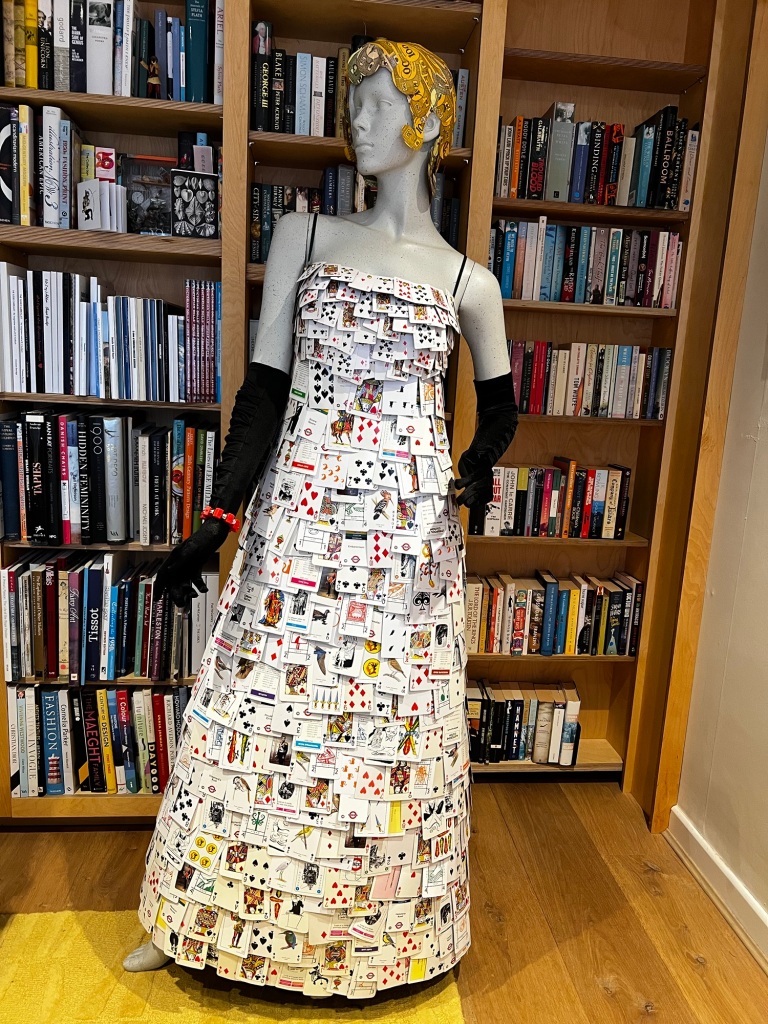
I decided to clothe my second mannequin in a dress made up of playing cards. The idea stemming from the cigarette card decorations that I made in December. I started to collect packs of card games. I picked up some colourful Top Trumps, Pokémon and Magic cards. As well as the standard packs of cards I was lucky to find others with a basic image on a white background . These included Sherlock Holmes’s, and a London Underground game. But my best bargain was a complete Monopoly game for just a couple of quid.
Packs of playing cards didn’t take long to gather up.
The easiest way to use the cards was to fix them to an existing dress using brass paper fasteners. I found a suitable floor length evening gown in a charity shop. The cards were fixed from beneath the main fabric, but on top of the lining. The majority of the fixings were pushed through a small hole made in the fabric from behind. The prongs being pushed through and spread out to hold the cards in place. Where the fixings are visible with the first row I kept the prongs to the inside.
Starting at the top! The smallest cards were fixed to the bodice section.
Having collected a variety of cards I decided to use only those with a white background. Mostly standard playing cards but I collected variations on these – the Monopoly ones being the most iconic.
It took a surprising number of cards to cover the dress. Somewhere in the region of 850, judging by the re- ordering of paper fasteners.
From the front…Layers of over lapping cardsAnd the back!
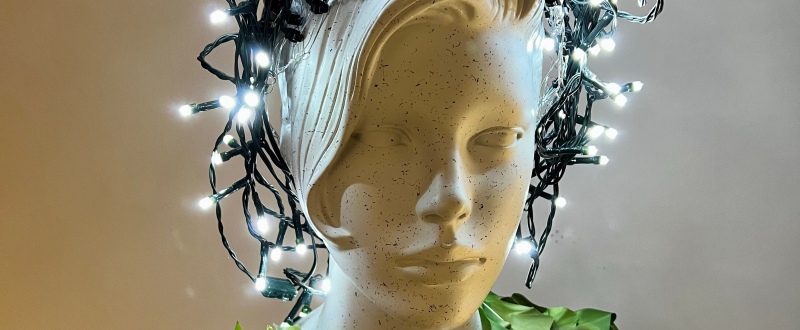
I created a mould of the mannequin’s head using a thin fabric and wallpaper paste. Once dried this was covered in Monopoly money curls. And I’m not done with the head decoration yet – more at a later date about that.
Monopoly maiden
The Monopoly hotels have been formed into a bracelet.. a swanky addition over the long black evening gloves.
Wearable hotels!
The dress can be removed from the mannequin, so it can be worn (by someone slim and tall!). The unused cards will be kept for another project. As ever, watch this space!
When I was looking at the Christmas trees on display at Standen house (a National Trust property in Arts & Crafts style) I was particularly struck by one of them . It had as decorations playing cards from the Happy Families game. I thought it was a simple and effective idea.
Happy Families on the drawing room tree at Standen Gouse
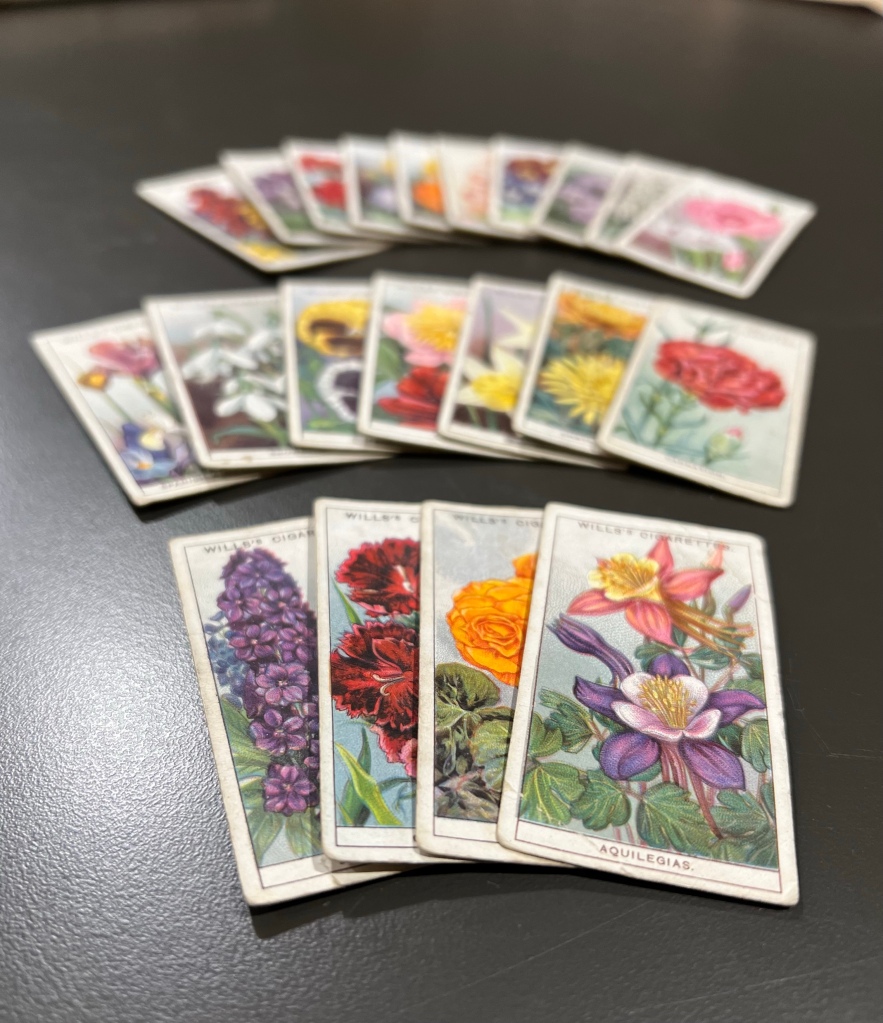
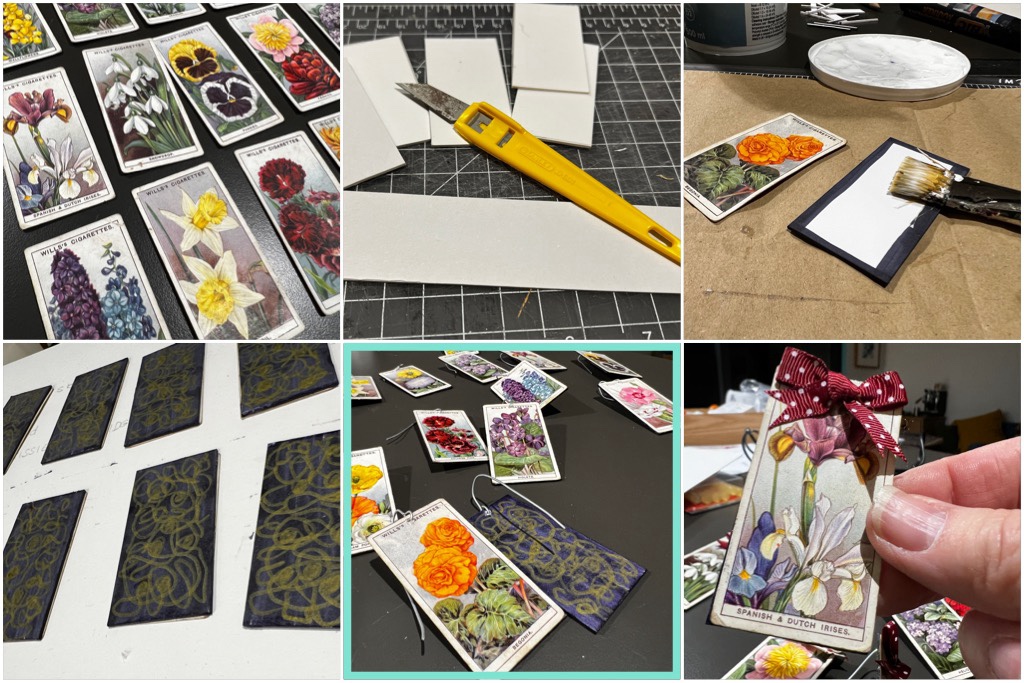
Whilst out browsing today in an antiques market I came across a selection of old cigarette cards. I suddenly thought that these would also work as novel decorations. Looking through the cards I found some featuring pretty garden flowers. I accept that they weren’t typically Christmassy, but would suit my untypical tree. The 21 cards cost me just £2.
The original cards measure 7cm by 3.5cm
This evening I set about turning them into ornaments. They were glued to rectangles of mount board (with the reverse decorated in black and gold). The mount board makes the finished ornament stronger. Both sides were varnished, before a tiny hole was made at the top of each one. A lengthy of wire was threaded through the hole (like making a larger version of a hanging earring wire), before a ribbon bow glued on.
Stages of construction Some of the cards in position
It took a few hours to complete, allowing for drying time. The finished floral images have just been added to my mannequin tree and I am really pleased with them.
It would be simple to reproduce this idea using ordinary playing cards (or mini ones). And how much more fun to find other card games? Ideal if you have an old set with missing cards… Monopoly cards perhaps?
Using pretty cigarette cards in this way could also turn them into gift tags (no wire required). Or you could string them together as a form of bunting. I know I’ll be on the look out for card sets with creative potential!
I find real Christmas trees sad. I’d much rather the trees remain growing in the landscape. Responsible people at least take theirs to a recycling point after the holidays are over. But I’ll always spot one or two, come March, still forlornly dumped, brown and wilted, beside domestic bins and back alleyways.
This year I’ve created a different type of tree. Well, not a tree at all.
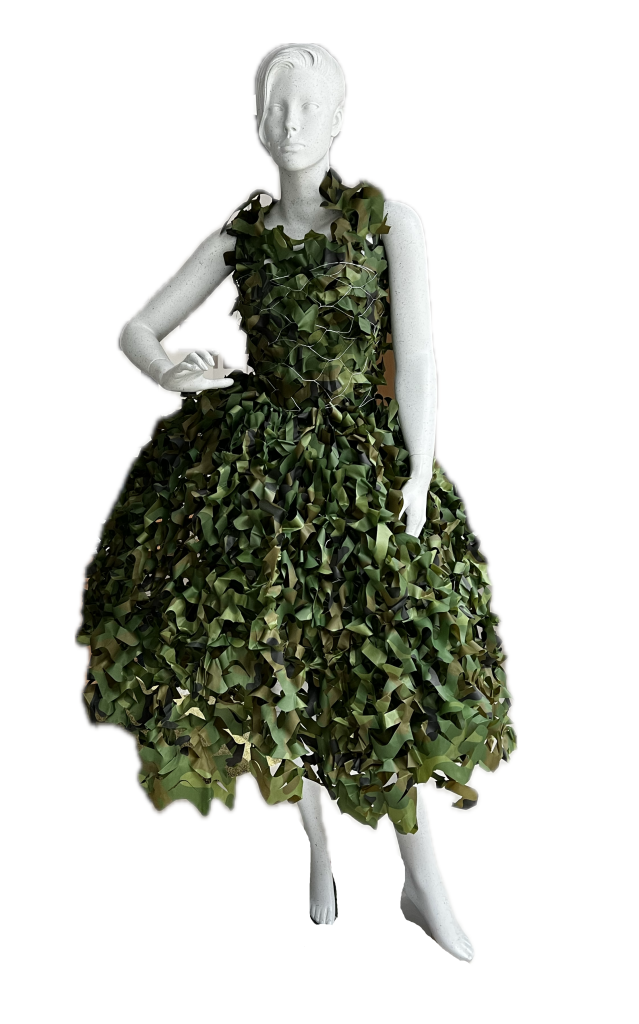
My original idea (and the ultimate destination) was for one of my mannequins to stand in the garden. But I wanted her to be dressed. Last month I made a start on the project. I formed a bell skirt shape out of chicken wire and added it to the mannequin. This was then covered in pieces of camouflage netting, completed with a wire bodice.
There is a range of foliage colours for camouflage, including a blue (courtesy of Amazon) if wanted. I chose a mid green combination though I was tempted by the brownish autumn hues
Wearing a dress of green
Come December as she stood in the living room awaiting removal to the garden I realised that she had a prior use. With the addition of Christmas ornaments and baubles she is in effect a Christmas tree!
Our alternative Christmas tree
I’m delighted with how she is looking in her bespoke outfit. With a halo of lights she is all set for the festivities.
A while ago I created a book through Blurb publishing to collate my interest in mannequins and fashion. I called it ‘Mannequin Me’. I now have a companion volume.
Pleased with the front cover designsEach cover represents hours of design work
Over the last few months I have become obsessed by creating fake magazine covers. I did one as a ‘birthday card’ substitute and the idea snowballed. It became a way of showcasing my favourite photographs. And I have lots of photographs! Many of the original photographs were used as ‘cut outs’, where I digitally removed a subject from its background. A meticulous process but worth the effort. I enjoyed teaming images for the different issues.
By putting the images creatively into a book my plan is to delete them from my computer. It’s easy enough to refill those digital albums.
Art Up Close reflects my various creative avenues, including the design of the book itselfTea & Cake was the quickest to design
I came up with 11 titles, plus a few individual ones along the way. The most prolific was Past Perfect with over 50 covers, reflecting my love of period properties and historical events.
Lovely Life sometimes featured friends, otherwise just inspirational covers
Just as I neared the end of the design process, I bought a book of copyright free fashion images. I used one of the illustrations on the title page but inserted a magazine cover that features in the book.
Three images combined made this one for the title page
The book has just arrived in the post and I am thrilled with it. It is A4 size and about 1 inch thick. But I’m delighted with all the hours of design work that makes up its contents.
I don’t have green fingers. I like gardens, but I am defeated by trying to create one! I tried for 14 years in my last house. No luck. So, I should be pretty pleased that this time it’s taken just over four. Though I’m not completely done.
The big redesign after moving in should have been the time. I had an idea in my head – no grass, just sculptural planting. But it took more time than I anticipated. And to be honest, I’d rather be working in the house…actually or a digital project.
Eventually I realised that grass was the answer. I can mow. I have done in the past. I could do again (although it means either borrowing a flock of sheep, or buying a lawn mower.
I had to take the garden right back to its just redesigned state. Before I put the plants in. In my head I could see what I wanted. I drew up a comprehensive plan for the garden contractors, and in between torrential rain showers, they set to work.
My plan for the makeover And the completed turfing
I’m pleased with the result. The circular bed is underway with pink Cordyline and under planting with almost black plants. It’ll take a while to fill out, but it should be good in a few years.
I have further plans for some other visual features, but you’ll have to wait for those!
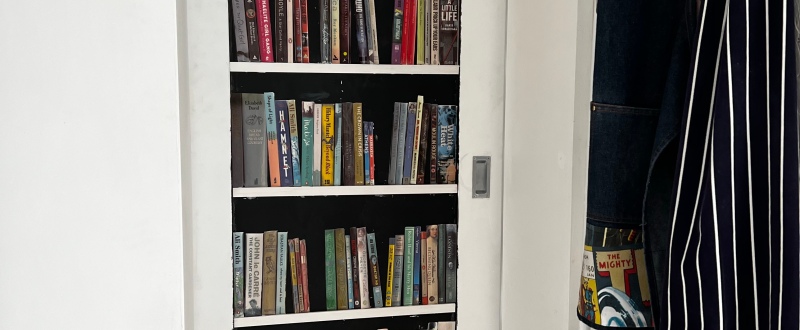
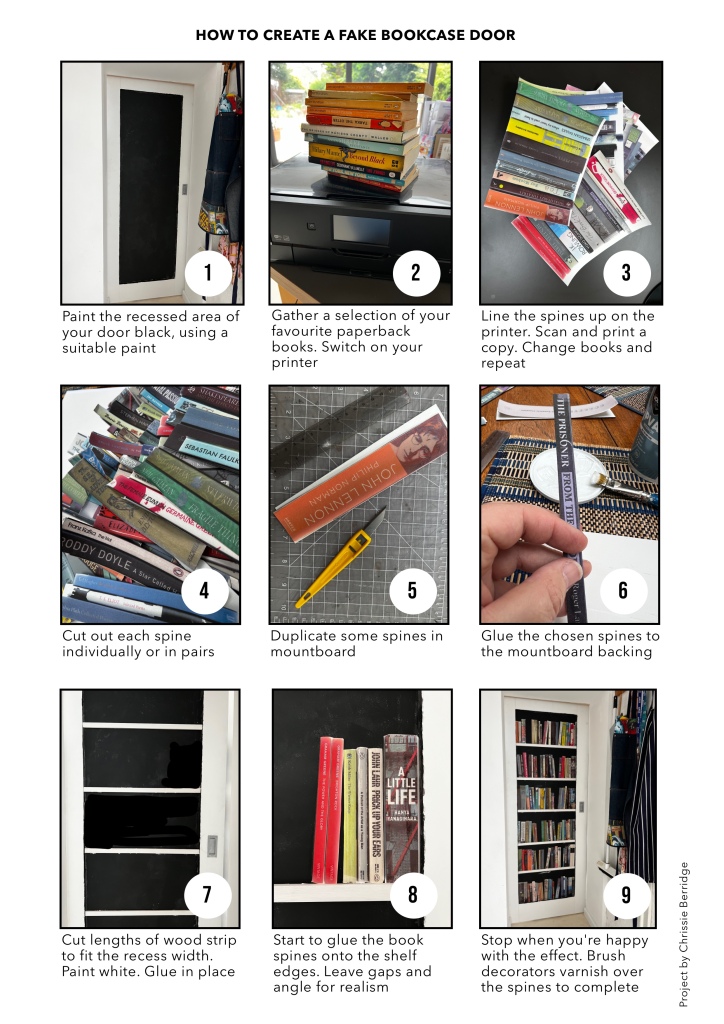
I’ve transformed a number of ordinary doors into a fake bookcase doors. It is easy to do – essentially it’s just scanning, cutting and sticking!
It works best when you have a recessed door. You just have to be brave enough to get out the paint for the background, and go for it. I haven’t tried the process on a cupboard door but don’t see any reason why it wouldn’t work. Why not capture your favourite books? And you can always borrow from the library for selected titles that you don’t own, or borrow from friends.
I have also used wrapping paper with vintage book spines to create a book door, so keep an eye out for that too.
You could theme your books depending on the room beyond. Enjoy the process.
Check the previous blog before the update here. The building work to divide the long through room is nearly done. And we’re really pleased with the results.
The new front room will be a cosy retreat once the white walls have a further makeover The new corner in the revised kitchen/dining space now looks out towards the garden. It just needs artwork back on the walls
The walls have been painted white as an immediate uplift, but ultimately they will be bolder – either with paint or wallpaper. The spaces look a little stark at this stage. The curtains will go back in the front room… the blinds on their own might look ok at the moment, but the autumnal seasons need that extra layer. i like the way that curtains frame and dress a window.
The main surprise with the reconfiguration is that there is no discernible loss of space. The middle section always felt like a corridor, and now it’s been closed off. Each of the new spaces has a dedicated corner. That’s two extra walls to hang artwork!
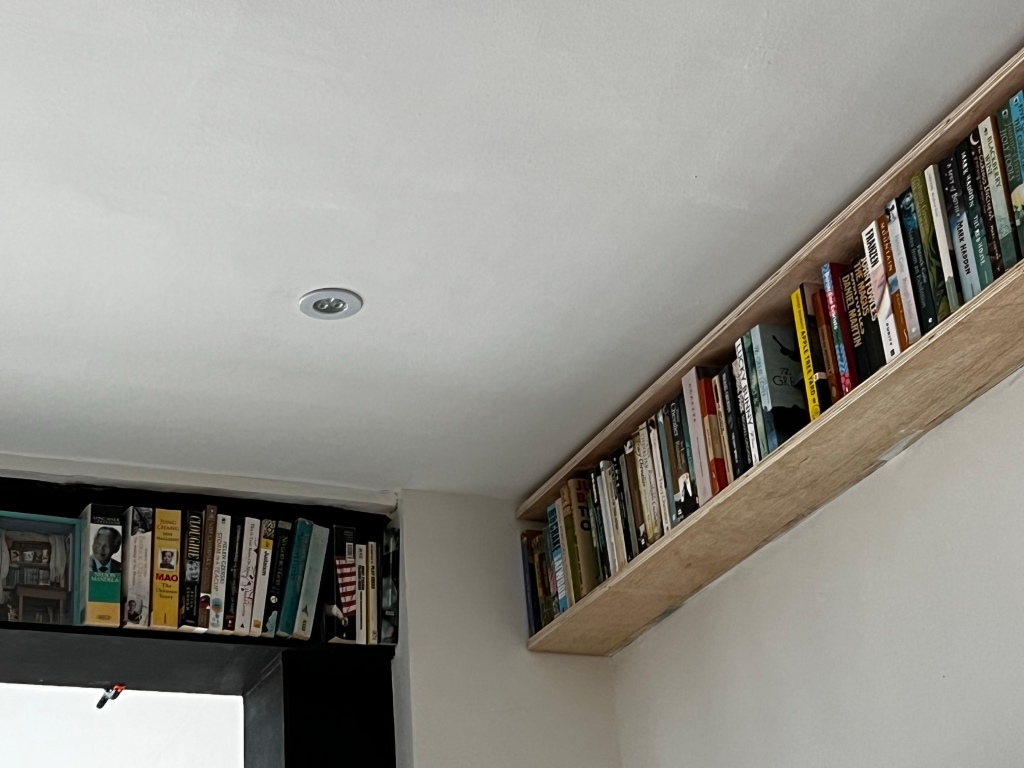
Getting replica ‘girders’ made from plywood has been brilliant in accommodating more of our book collection . It acts like a halo above the new seating area. I may paint them black to match the girders (although that could look a little heavy) but for now they’re as seen.
The plywood box shelf mirrors the girders
I’m taking my time deciding on the ultimate colour scheme. I’m just glad to get the work done to this stage. It’s been all go with another building project running alongside and a garden transformation around the corner. Hopefully years of watching ‘house’ shows on to and reading home style magazines is paying off!